Now you can make every object around you into a virtual 3D model from pictures and you can see it in 3D with Desktop AR on your home computer!
Online shopping is growing rapidly, especially in the covid era, and when you buy online, most people want to see and touch real products before making decisions. With Virtual Reality (VR) and Augmented Reality (AR) technologies, the shopping experience is now very different as you can see the objects in 3D with AR/VR systems. With many AR/VR systems available on the market, the 3D contents are wanted more than ever. In this article, we show you how to create 3D models from real objects with multiple pictures to make 3D contents for the AR/VR technology in 4 STEPS.
Once you finish making the models, you can add it to the Desktop AR system with Holo-SDK and you can see your models in holographic 3D!
What you need
Mobile Phone
Red-Blue 3D glasses
Computer
Agisoft Metashape (30-day trial version)
Unity (Version: 2019.3.14f1 plus)
STEP 1: Take pictures

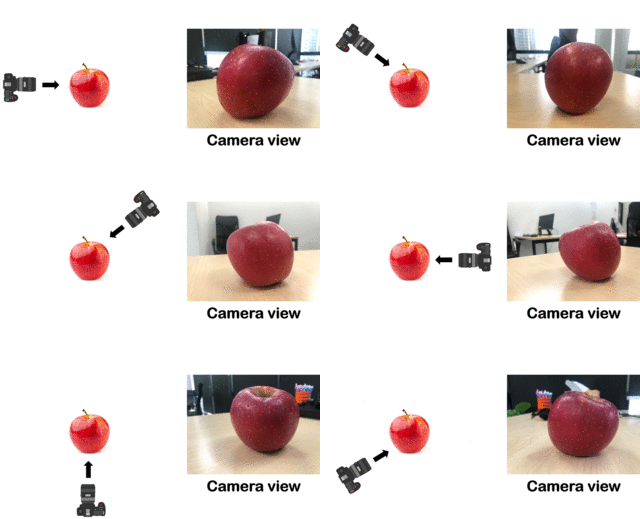
To take pictures for making a photorealistic 3D model, the rule of thumb is that consecutive pictures must be at least 50 percent overlap. You have to take pictures around the object of interest. Make sure that an entire object is visible in each image and the object should not be reflective or glossy.
STEP2: Make a Photorealistic 3D model
Once you have installed Agisoft Metashape Standard Edition (trial version), open the program and these steps.
2.1 Add Photos
Click Workflow -> Add Photos... on the top menu.

Browse to the folder containing your images. Select all images you want to use to create a 3D model. Then, click Open to import all images into Agisoft Metashape.

2.2 Align Photos
Click Workflow -> Align Photos... on the top menu. Make sure that in the General option menu, in the Generic preselection list, set Accuracy to Medium or High. Finally, click OK to generate a sparse point cloud model. It might take sometimes in this process.

2.3 Build Dense Pointcloud
Click Workflow -> Build Dense Cloud.... Make sure in the General option menu, set Quality to Medium or High. Finally, click OK to a generate 3D model of your chosen image, and the output from this stage will be a dense pointcloud. You might need wait awhile for the program to complete the processes.

Some pointcloud are unnecessary and need to be removed. Make sure that the model is more beautiful. See the video demo on how to removed unwanted poincloud in 3D.
2.4 Build Mesh
Click Workflow -> Build Mesh..., in the General option menu, set Source data to Dense Clouse, Surface type to Arbitrary (3D) and Face count to Medium or High (if you want your model to be very detail, set to High, otherwise Medium is generally sufficient). Finally, click OK button to generate mesh model and wait for the program to complete the process.

2.5 Build Texture
Click Workflow -> Build Texture..., you can use the default parameters to create a 3D model. In here, in the menu, we set the resolution of the 3D model (Texture size/count:) to 4,096 x 3 so that the model looks realistic. Click OK button to generate the texture for the model.

2.6 Display and Export model
You can see the texture model by clicking Model -> View Mode -> Model Textured. Next, the export model process clicks at File -> Export -> Export Model... button. Then, please select the file directory that you need to save and set File name:. In this process, Save as type: recommended is OBJ format. Next, click Save button to the next step. Finally, the last pop-up will show the detail of exported model and then click OK button to export the model. You can view your 3D model for free via 3D Viewer application in window 10.

STEP3: Setup the Holo-SDK in Unity
Get started guide for set up a project in Holo-SDK in Unity.
STEP4: Put your 3D model in Unity and make it hologram with Desktop AR with Holo-SDK
Import your model into your Unity project by dragging your model into the Assets folder in Unity project.
Drag the 3D model prefab from the model folder to HoloUnitySDK -> HoloStage -> HoloObjects.
Place your model in front of the HoloScreen and click Play button to adjust the position of your model.
There you have it, the photorealistic 3D model in hologram with a Desktop AR system on your PC. To view your model, put on your Red-Blue 3D glasses and enjoy!
Get Holo-APP here: https://www.holo-sdk.com/sample-apps
Get Holo-SDK here: https://www.holo-sdk.com Follow us of Facebook: https://www.facebook.com/PerceptionHoloSDK
Follow us of Twitter: https://twitter.com/PerceptionCodes
Follow us on YouTube: https://www.youtube.com/channel/UCsiRcn3XRJQsAUoWmQQH9Rg
Extra tags: #EduTech #HologramComputer #HoloSDK #HoloApp #DesktopAR #VR #AR #MR #VirtualReality #AugmentedReality #MixedReality #ImmersiveTech #Anaglyph

Dr Krisada Chaiyasarn is an expert in Computer Vision and Machine Learning applying to the construction industry. He worked in a number of years in this area, including his PhD research. After he completed his PhD from the University of Cambridge, he worked as a technologist in a bank and he is now Assistant Professor in Thailand as well as a Chief Technical Officer at Perception, the company that develops Desktop Augmented Reality technology to bring holographic experience to daily use computers.

